Changing Your PC's Boot Device Priority
Changing your boot priority will allow a system to boot into another volume without erasing your startup drive. Also helpful if you are trying to install a fresh copy of Windows or any other operating system like Ubuntu.
You can change a system's boot priority within its BIOS. There are a variety of computer configurations and motherboards which utilize different BIOS vendors, your system and function key combinations may not be listed below in the chart. However, your function keys are typically displayed briefly when your system restarts. You may have to restart your system more than once if you miss it or refer to your system’s manual.
Once you identify the function key for your system, restart your system and repeatedly press the key or keys to invoke the Bios menu or Boot menu. If you see the Windows splash screen you have missed the timed window and will need to retry again.
Getting "No bootable devices found" or asked to repair the startup drive?
On the occasion that the system says "No bootable devices found" or no longer booting into your OS normally. This means your startup drive is corrupted, failing, or disconnected. I recommend reading through our blog "How Long Do Hard Drives Last?" for more information. If you discover that your drive is corrupted, you can recover the data on the disk using Data Rescue for Windows. You will need to extract the drive or scan it while booted into another drive.
Step 1
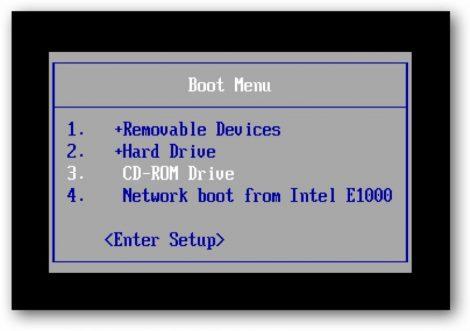
Restart your computer and you may see a screen that says, “Press F12 Boot for boot Menu” or “Press Del for Setup”.
Step 2
Once you have entered the boot menu, you can use the up and down arrows to select the device you want to boot from. If you were unable to enter the boot menu, you may not have that feature on your computer. In this case, go to the next step to enter the BIOS and change the settings there.
Step 3
Press the “Del” key in step 1 for entering the BIOS. This might be the “Delete,” “F1,” “F2,” “F10” or “Esc” key. (NOTE: Please see table below for computer model specific keys).
Step 4
Navigate using your arrow keys to the menu titled “Boot Sequence”, Boot device Priority” or “Advanced Boot Options.” Find the listing for “Boot Sequence” or “Boot Order.” Highlight the device from which you wish to boot and press “+” to move it to the top position. On some BIOS screens, you may simply be able to highlight the first position and press “Enter.” You can then select the device from the submenu. Instructions are typically listed at the bottom of the BIOS screen.
Step 5
Press the “F10” key to save and exit. You will now be able to boot from the chosen device.
This is a list of most OEM PC’s boot menu keyboard function keys.
If your PC is not listed it could be one of the following keys : ESC, F10, F12, or F2. Additionally if your PC does not support a separate boot menu you can use the “ Del” key to access the system bios and change the boot priority manually.
OEM PC’s – Boot Menu Keyboard Function Keys
| Computer Model | BIOS Keys |
|---|---|
| Acer® | F1, F2, CTRL+ALT+ESC |
| AST® | CTRL+ALT+ESC or CTRL+ALT+DEL |
| Asus | F8 |
| Compaq® 8700 | F10 |
| CompUSA® | DEL |
| Cybermax® | ESC |
| Dell® | F12 |
| Dell® 400 | F3, F1 |
| Dell Dimension® | F2 or DEL |
| Dell Inspiron® | F2 |
| Dell Latitude | Fn + F1 (during boot) |
| Dell Latitude | F2 (once booted) |
| Dell Optiplex | F2 or DEL |
| Dell Precision™ | F2 |
| eMachine™ | F12 or DEL |
| Fujitsu | F12 |
| Gateway® | ESC or F10 |
| Gateway® 2000 1440 | F1 |
| Gateway 2000 Solo™ | F2 |
| HP® (Hewlett-Packard) | F1, F2 or ESC |
| IBM® | F1 or F12 |
| IBM® E-Pro Laptop | F2 |
| IBM PS/2® | CTRL + ALT + INS after CTRL + ALT + DEL |
| IBM Thinkpad® | Start > Programs > Thinkpad CFG |
| Intel® Tangent | DEL |
| Lenovo | F12 |
| Micron™ | F1, F2 or DEL |
| Packard Bell® | F1, F2 or DEL |
| Sony® VIAO | F2 or F11 |
| Tiger | DEL |
| Toshiba® | F12 |
| Toshiba® 335 CDS | ESC |
| Toshiba® Protege | ESC |
| Toshiba® Satellite 205 CDS | F1 |
| Toshiba® Tecra | F1 or ESC |
Accessing the boot menu
Accessing your system bios
