Using Target Disk Mode to Recover Macintosh Hard Drive
Recovering Mac HD Using Target Disk Mode
Do you have an old, non-booting Mac or drive that will not mount properly? If the internal drive that you want to recover files from is no longer booting, you can use Target Disk Mode to access the drive and try to run a scan using Data Rescue software. Using this method will require another working computer and a Firewire or Thunderbolt cable to connect the two computers together.
Note: If you do not have a Thunderbolt or Firewire cable, you can create a separate bootable drive from within our software called the Recovery Drive. This would require a USB 3.0 flash drive with at least 32GB. On Prosoft Engineering’s Support Page for Data Rescue, there are step-by-step instructions for creating the Recovery Drive.
I have helped a few customers with using Target Disk Mode and Data Rescue to recover their files from a Macbook Pro. I can recall one customer having issues with his Macbook Pro not booting correctly when he needed to recover an important document. The customer did not have any extra drives to use as a separate boot device but, fortunately, he had a Firewire cable and iMac that he could use to scan the non-booting Macbook Pro.
I remember guiding the customer through the process of preparing Target Disk Mode and starting Data Rescue on his working iMac. The customer was able to see the non-booting Macbook Pro drive show up on his iMac desktop and within the Data Rescue software, so he chose the drive to run a scan.The customer was able to preview all of the files from the Macbook Pro confirming they were not corrupted.
The customer then purchased the software so that the files could be recovered to the iMac computer. I guided him to activate the software by selecting the Help → Activate drop-down menu opening another window to enter the purchased serial number.
Using Target Disk Mode is just one of a couple different ways that you can boot from a separate drive to run a scan and recover files from a non-booting Mac. You would simply connect your Firewire or Thunderbolt cable so that the two Macs are connected, and then follow the steps below for setting up Target Disk Mode.
Starting Your Mac in Target Disk Mode
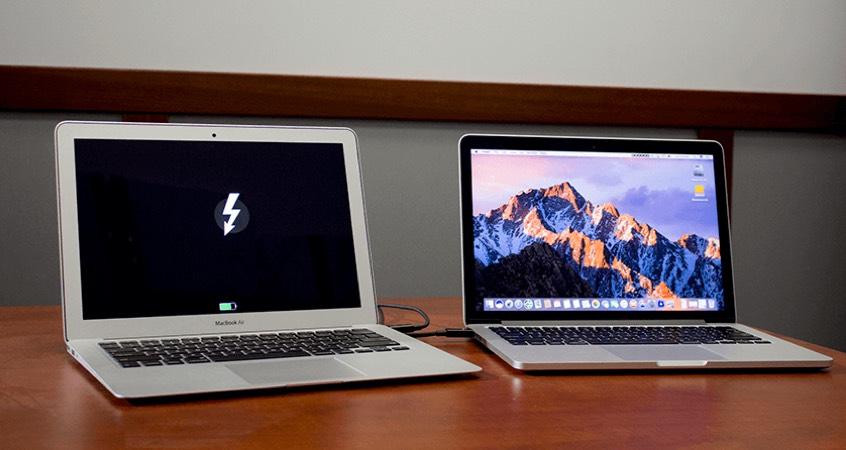
Now that you have your non-booting Mac connected to a working Mac, you can start up the non-booting Mac in Target Disk Mode. You would do this by powering off the non-booting computer, and then powering on that same computer holding down the “T” key. You will notice when the computer is in Target Disk Mode when your screen displays the Firewire or Thunderbolt symbol shown below.
Note: You do not need to power down the working computer at all when preparing Target Disk Mode.

You will know that you have correctly connected the non-booting drive to the working computer once you see the drive show up on the working computer desktop. The drive will be shown with either the Thunderbolt or Firewire symbol on it, depending on how you have the computers connected.
If you are unsure about running the scan on the non-booting Mac, check out the section below for a basic walkthrough. If you would like more detailed instructions, please check out the Data Rescue support page.
Scanning a Non-Booting Drive Using Data Rescue
For this scenario, you will want to have Data Rescue downloaded on your working computer. Once you have opened the application, there should be four options to choose from: Start Recovering Files, View Previous Scan Results, Clone, and Create Recovery Drive.
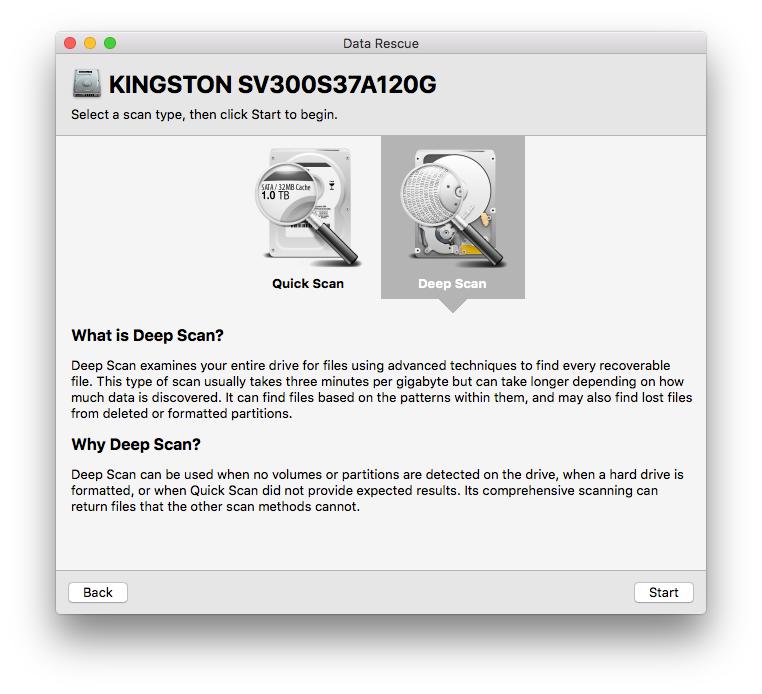
To start a new scan, you will want to select “Start Recovering Files”, which will display the source drives connected to the computer. The non-booting Mac drive will be displayed here if Data Rescue is able to recognize the drive. Once you select the non-booting drive, select “Next” and choose the type of scan you want to run.
I would recommend choosing the Deep Scan option to recover the most amount of data from your drive. Once you start the scan, it is best to leave the computer and not doing any other work on it until the scan is complete. If you continue to use the computer, this may slow the process of the scan.
Is Your Hard Drive Not Being Displayed on the Desktop?
If the non-booting hard drive is not recognized by the Data Rescue software on your working computer, that may indicate that the drive is failing from physical damage. Any failing drive could potentially be recovered through physical data recovery services.
Our sister company, The Data Rescue Center, should be contacted for any physical data recovery service. They have experience working with failing drives since 2009, and are able to provide a free analysis of your drive.
You can contact The Data Rescue Center for more information about their recovery services. Also, feel free to give them a call if you would like to speak to a representative in person at (877) 501-4949.
How to Verify Your Data After the Scan
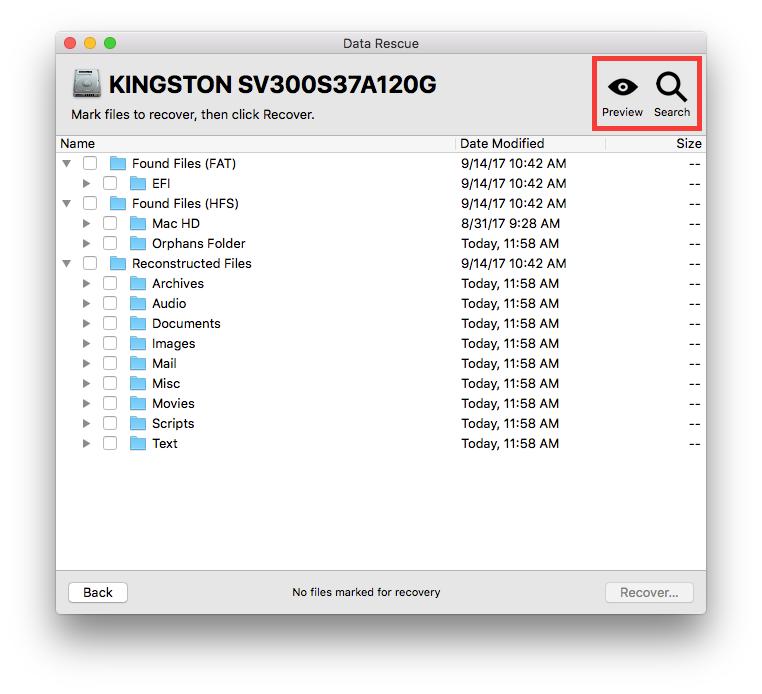
You can verify your data after the scan to make sure the files can be opened on your computer. I would suggest previewing most of the file types you plan on recovering to check for any corruption.
To preview any file, all you need to do is select or highlight the file and then select the Preview icon that looks like an “eye” within Data Rescue. This will launch the preview screen in another window and will display the file that is highlighted. If the file shows completely in the preview, then that is a good indication the file is good and will be able to be opened on your computer.
If any of your files are not being displayed in the preview of Data Rescue, then that would indicate the file is corrupted and would be unrecoverable. If only part of the file is being displayed would also indicate some corruption.
Stay Safe with Backup Software
Don’t risk the possibility of losing all of your data forever. I would recommend creating a backup of all your important data in case anything were to happen to your main drive. Although it is not always guaranteed that you will be able to recover all of your data using Data Rescue, it is better to have it installed and prepared than to not have a backup at all.
Prosoft Engineering offers backup software called Data Backup that allows you to create a special backup set to fit your backup needs. The benefit of this backup software is that you have more customization for your backup so that you can specify exactly what you want backed up, the kind of backup you want to perform, as well as how often you want it to run.
Don’t Give Up on Recovering Data from Your Old, Non-Booting Hard Drives!
Dealing with non-booting hard drives may seem impossible to recover, but that is not always the case. As long as the drive is not mechanically failing and is able to be recognized as an external drive, then you can run a scan with data rescue software to recover the data.
Whether you are dealing with a Macbook Pro, Macbook Air, or iMac, the steps to run Target Disk Mode and scan the hard drive would be the same. However, there are other methods to accessing the drive and running the scan, so feel free to check some of our other blog posts where we describe different scenarios.
About the Author
Matt T.
My name is Matt and I work alongside the technical support team at Prosoft Engineering to provide friendly customer support for anyone using our software. I am also a customer service representative for their sister company, The Data Rescue Center. I enjoy helping others and strive to inform users on how to keep their files safe and maintain performance for their computer.