Recover Deleted Files from Home: The Complete Guide

If you are not familiar with the term “data recovery”, it refers to the process of retrieving or restoring files that are no longer accessible to the user on the hard drive. This can be the result of deleting a file and emptying the trash, accidentally formatting the wrong drive, or even from viruses and malware.
Data Recovery is possible on both a Mac and PC, but unfortunately it is not guaranteed to work in every occasion. To help guide you, I will go over the steps you should take to safely recover your data if you have deleted files from your computer and emptied the trash.
If you would like to skip straight to the tips and steps that you should take when recovering deleted files, you can scroll down to the section, “Data Recovery Process Tips & Tricks”.
I work in the field of Data Security and Data Recovery, which is surprisingly unknown to the majority of computer users. Before I started working with Prosoft Engineering, I was unaware of what a hard drive is, how it functions, or that data recovery is even possible. Now I can share with you my knowledge and some tips that I have learned from working in technical support that can better assist your recovery.
To get a brief background of our company, Prosoft Engineering has been in the industry of Hard Drive Recovery for over a decade, enhancing their award-winning data recovery software as well as creating an optimized disk utility software called Drive Genius.
Prosoft Engineering actually started its data recovery journey back in 2002, by needing to recover files that were accidentally deleted. Except, at that time, there was no such thing as data recovery. So Prosoft decided to create their own data recovery software to provide a solution for the people that ran into the same problem.
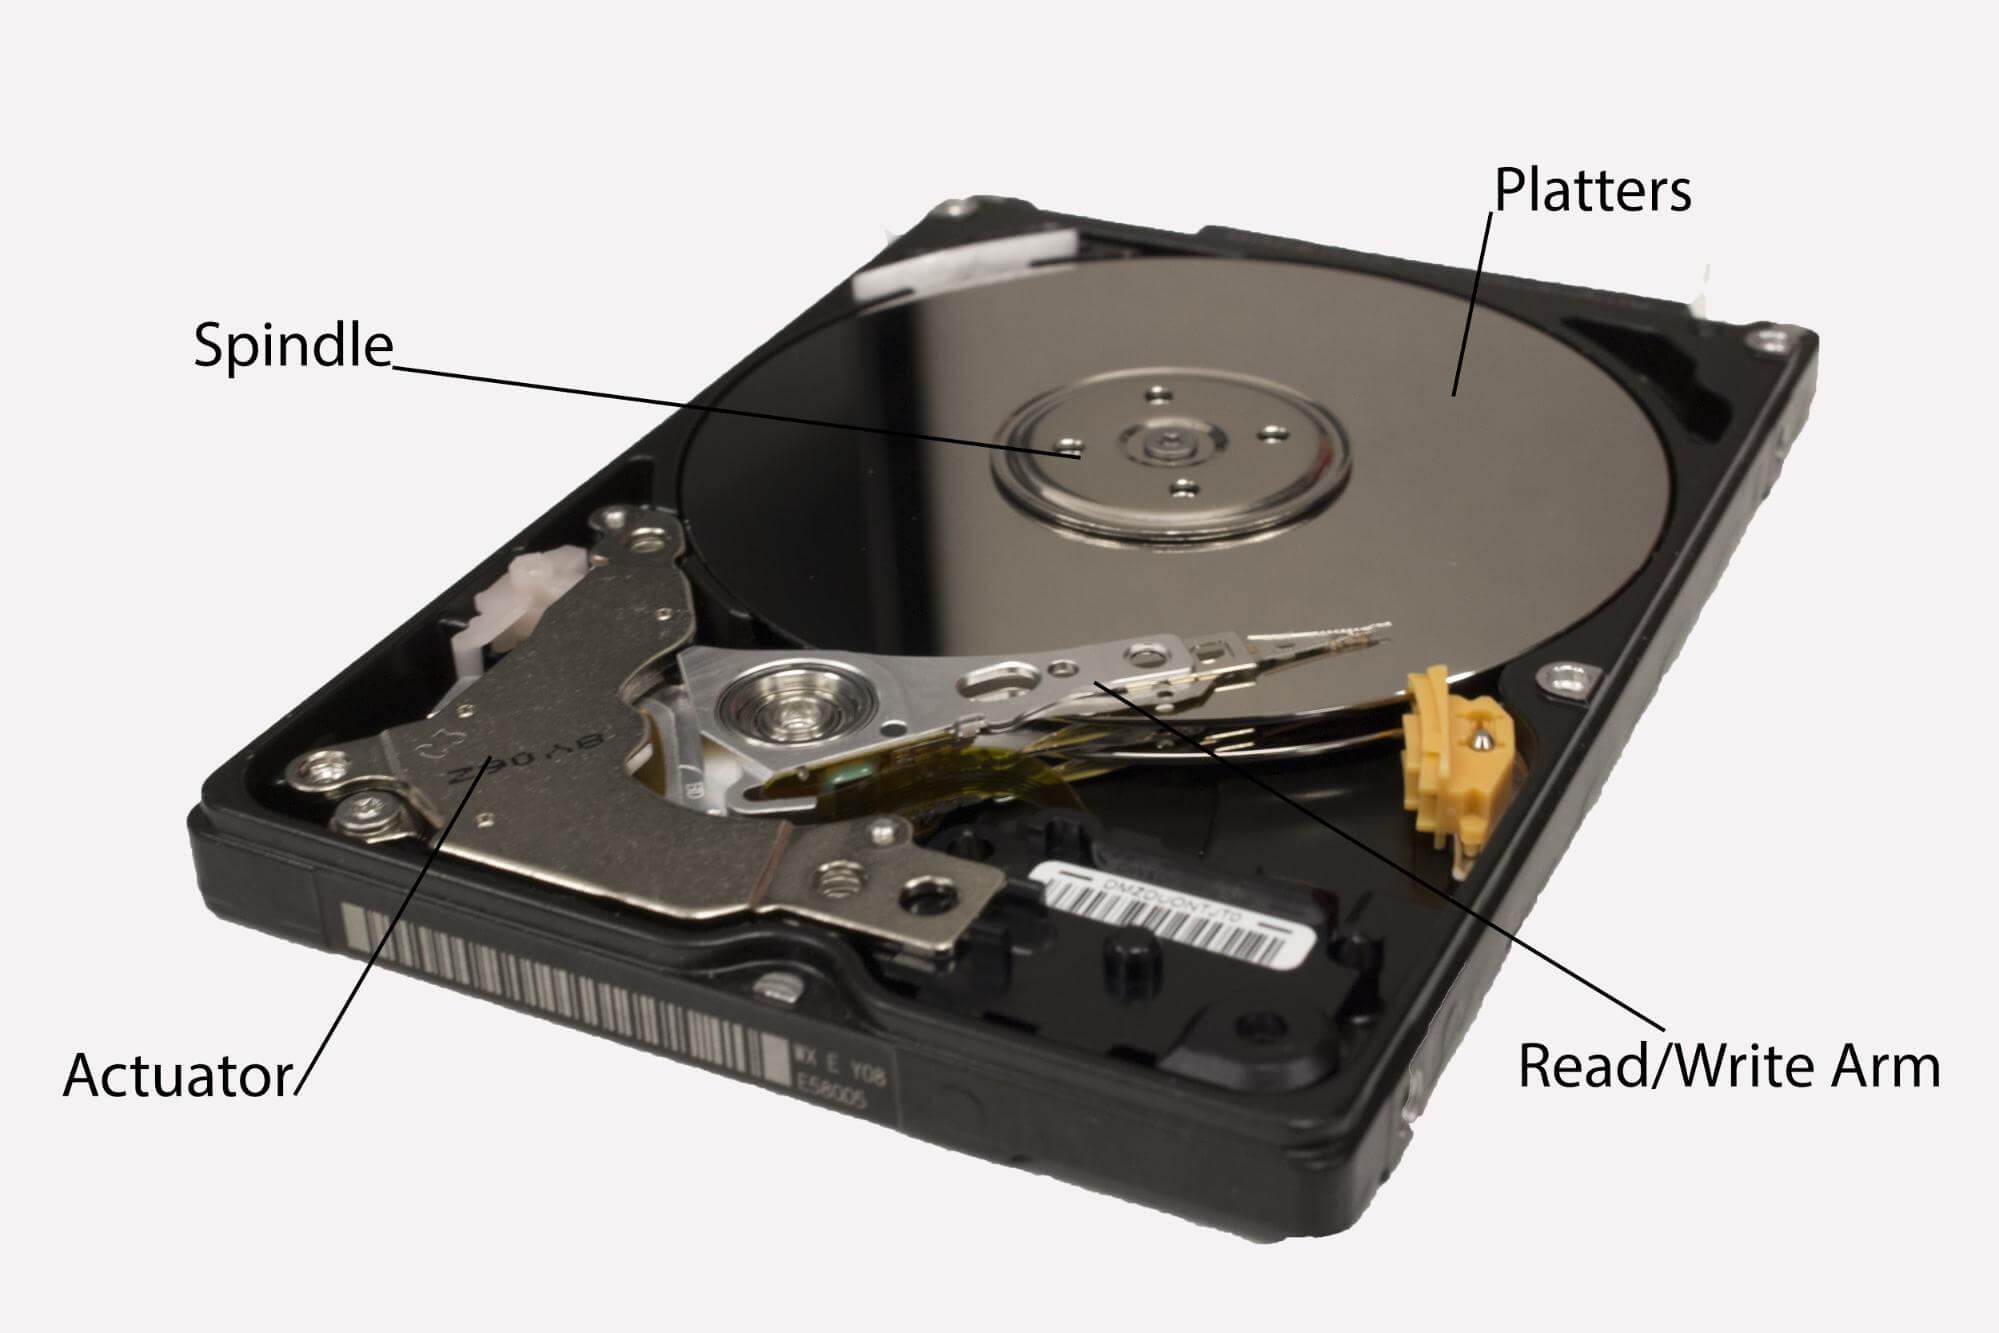
A Brief Rundown on How Hard Drives Work

The image above shows one of our technicians explaining hard drives to students on a field trip. Our technicians deal with the most severe recoveries on a large variety of media devices within our sister company, The Data Rescue Center. During this time, our company had the second field trip for a video productions class to teach them how hard drives work. Our goal here at Prosoft Engineering is to educate as many people as we can to better understand how their computer works and how to take care of the hard drive so you do not lose data.
To better understand the recovery process, I will briefly explain how your hard drive operates. As I mentioned before, your hard drive is the sole component in your computer that stores all of the files that have been saved for long term access. The key part of storing data is that it must be able to write to a device that can hold the information to be accessed later. The hard part is holding the information when there is no power in the device.
01001000 01100101 01101100 01101100 01101111
This series of 1’s and 0’s is called binary and can be read by your computer. The series of numbers above can be decoded by your computer and would say, “Hello”.
All your files are written and stored in binary code, a coding system strictly using the digits 1 and 0 to make up different letters, numbers, and characters in a computer. One way this binary code is stored on a drive is through the use of magnets. The data is stored and magnetized on the platter of traditional disc drives. The area of the drive on the platter can either be magnetized (Read as a 1) or demagnetized (Read as a 0).
The area on the platter is split into sectors and within those sectors is where the files are written to specific blocks. You can think of the platter of the disc drive as being similar to an old record in which the stylus glides over the record’s grooves reading the music. Traditional hard drives act the same way in which the read/write head will extend over the platter surface to read and write data to the disc.
When referring to solid state drives, there are no physical moving components or magnets. Instead, it uses a grid of electrical cells to store the binary code on the drive within a series of NAND chips. The data is written on the NAND chips across pages that form together to make a block. Even though SSDs require electricity to read and write data, the NAND chips are able to retain the information stored when it does not have any power.
By knowing that your files are written in binary code and stored in certain areas on your drive, you can better understand the process of recovering deleted files. Because data has to be written and read from the drive, there also needs to be an operating system to read or write the files information.
When a file is trashed and emptied from the trash, the operating system will remove the information pointing to that file along with the metadata which includes the filename and folder structure. This causes the area on the drive where that file is stored to now be registered as available space for new files to be written to that area.
When new data is written to that same area, the files would then be overwritten and unrecoverable. During the scanning process using data recovery software, the software tells the operating system to search through the area that is registered as “free space” to locate the file that was deleted.
Recovering Deleted Files from Your Hard Drive May Take Some Time
In order to recover files that have been accidentally formatted or moved to the trash and emptied, you will need to use a software, such as Data Rescue, that can scan your hard drive and restore your data. Specifically, the data recovery software will need to be able to scan the unallocated or “free” space on your hard drive, recognize various files, and restore the files. It is never guaranteed that the software will be able to restore the files, which is why our software offers a free file preview to verify the file’s integrity. The entire process of recovering data can take anywhere from a few hours to a few days depending on these factors:
Size, capacity of hard drive
How the hard drive is connected
Age of the hard drive
Any logical issues
Any physical issues
The size of your drive will affect the recovery process, with a healthy 1TB traditional disc drive averaging about 6-8 hours for the scan, and a 1TB solid state drive averaging about half that time. The recovery should not take longer than the scan, but it depends on how much data you select to recover. If you are getting more than 5 read errors when you start the scan, you will want to stop the scan and either clone the drive or send it into our data recovery service. The read errors indicate there is an issue scanning the drive, and this could be due to corruption or drive failure. Read the next section for tips on noticing signs of hard drive failure and if you need a data recovery service.
Data Recovery Services Are Unnecessary for File Deletion
When searching for ways to recover your data, you may come across data recovery services where a technician would try restoring your files. Since you are looking for deleted files, you can ignore these services for now because data recovery software has made this process much easier.

If you were to send your drive into a data recovery service to recover deleted files, you would be paying a technician to use a software like Data Rescue to restore deleted data. This process can be much more expensive and take longer than if you use the software yourself.
However, sometimes there are situations when you would need to send the drive to a data recovery service to recover data. Recovery centers such as our sister company, The Data Rescue Center, have trained technicians that perform expert level repairs to drives that are failing, so the data can be restored to another drive.
Here are some of the most common symptoms of drive failure to look out for in which you would want to send your drive to be serviced:
You hear any clicking or scratching coming from a traditional disc hard drive.
Your hard drive or solid state drive is not mounting, or is not accessible.
Your computer will not turn on or finish booting.
The drive has had any physical damage resulting in one or all of the above.
Why Choose Data Rescue
Good question. There are so many recovery softwares out there, which one can you trust with restoring your valuable files? To give you some confidence in our software, Data Rescue, you can look into Prosoft Engineering’s mission and how the company formed.
The best part about choosing Data Rescue is that you get technical support available Monday through Friday to help with any questions that you have about the software. Our technical support works in the same building as the developers of the software and are able to correspond with them to assist in more severe technical issues when the software is not running on your computer. Not only is someone able to help guide you in the right direction, you can try a demo of Data Rescue that offers a free file preview to verify the integrity of your files.
Data Recovery Process Tips & Tricks
To ensure a safe recovery process and prevent damage to your storage device and data, follow these best practices to improve chances for a successful recovery:
Stop working on your computer immediately, to lessen the chance of writing over the files you deleted.
If you don’t already have Data Rescue installed on your computer, make sure you change the download location to an external hard drive to lessen the chance of writing over the files in the downloading process.
Files that are recovered will have generic file names, since the deletion process strips the metadata that holds the file names.
Files must be recovered to a drive other than the one you are scanning. This ensures you do not overwrite files you want to recover.
If you are trying to recover deleted files from your main internal hard drive, we recommend running the software from an external drive or using a Recovery USB device. You can create your own Recovery Drive with a high speed USB 3.0 flash drive with at least 32GB of space here: How to create your own external boot drive.
Step-By-Step Visualization of Using Data Rescue
Once you have taken the precautionary measures, before continuing with the recovery, you can follow the step-by-step list of the recovery process using Prosoft Engineering’s Data Rescue software for Mac. If you are running a PC, all the tips and methods are the same, but the interface may look slightly different.
For the recovery process you will need an external drive that you can download and transfer files to. I would recommend using an external drive to download the application Data Rescue, as well as transferring any recovered files from the drive you scanned.
You can download the software directly to the drive you want to recover from, but this could potentially overwrite files and you would need an external drive during the scan process anyway.
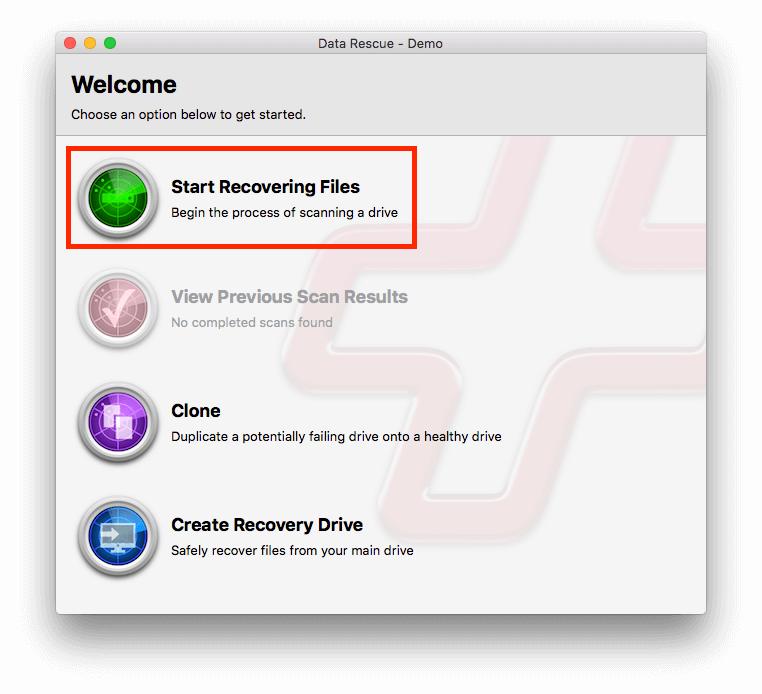
Step 1: Request demo, download, and launch Data Rescue Software.
Step 2: Activate software and select “Start New Scan”.
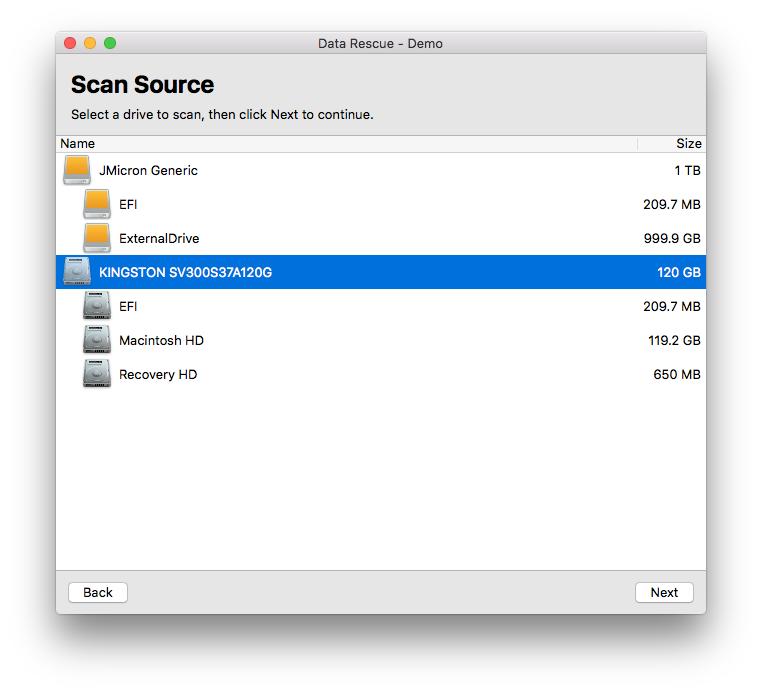
Step 3: Select the hard drive you wish to recover deleted files from and click “Next”.
Step 4: Select the “Deep Scan” task. Select “Start”.

Step 5: The scanning begins. All scanning progress will be shown in the window. This is the actual live process where Data Rescue is looking to recover the deleted files in the free space of the hard drive.

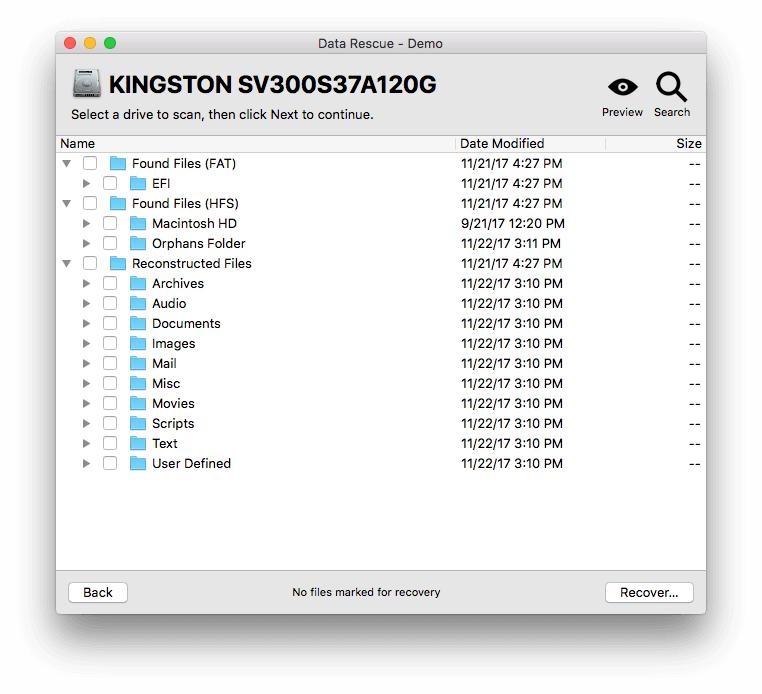
Step 6: Results after the scan. After the deep scan has completed, a window with all of the files that are recoverable will be displayed. Take the time to look through all of the files, and preview to check file integrity. Select the files you would like to restore and click “Next” to recover them to your destination drive.
Step 7: Select a destination folder. This will be the location that the files are recovered to, and cannot be the same drive as the drive you have scanned.
Your Recovery Is Complete
I hope you made it this far with success, and were able to find the files the you accidentally deleted. If this blog has piqued your interest in the performance of your hard drive or you want to prevent any future disaster in which your data could be wiped. Look into the disk utility software, Drive Genius, and personal backup software, Data Backup, which offers personal customization for backing up your files.
The biggest thing that you can do to preserve the data stored on your computer is to have a healthy backup of your files on an external drive and placed in a secure area so it does not get knocked down or bumped. I highly recommend starting a backup or a clone of your drive because a hard drive failure can happen at any time, and it is better to have your files safely backed up instead of lost forever.
Remember, our technical support staff is available during the week and can help give you guidance as well if you have any questions about any of the software that we offer. You can email, or chat live with one of our support representatives that are located in the same office as our sister company, The Data Rescue Center.
About the Author
Matt T.
My name is Matt and I work alongside the technical support team at Prosoft Engineering to provide friendly customer support for anyone using our software. I am also a customer service representative for their sister company, The Data Rescue Center. I enjoy helping others and strive to inform users on how to keep their files safe and maintain performance for their computers.