Making a Bootable USB with Drive Genius
Making a Bootable USB with Drive Genius
Whether you are running on Drive Genius 5 or the previous Drive Genius 4 or Drive Genius 3, this post will provide the steps on how to create a secondary startup drive in order to run specific scans/utilities onto your internal drive.
Have you ever opened your MacBook to see a flashing folder with a question mark on it? The flashing question mark is a sign that the Operating System that runs your computer is not accessible. This can be caused from a couple of issues: either the hard drive is physically damaged and the files cannot be accessed, or the Operating System has become corrupted.

If you were to take your MacBook into the Apple store with these symptoms, they would attempt to reformat your hard drive and perform a fresh install of the OS; this will repair a majority of corruption issues. However, if the issue was a physical problem, a reinstall of the OS will not repair the problem. When your hard drive is reformatted and the OS is reinstalled you will also lose all of your files, folders, and applications. Without a valid backup there will be no way to get all of your files back.
Before you decide what needs to happen (whether you should replace the hard drive or extract the data and reinstall the operating system), Drive Genius will allow you to create a bootable USB stick that you can use to check your internal hard drive to figure out what the problem is and how you can go about fixing it.
How to Create a Bootable USB in Drive Genius 5
Drive Genius 5 is the latest release of our Drive Genius software. It includes the BootWell technology which allows you to create a secondary startup drive that can be booted to so you can run certain features of Drive Genius on your internal drive. The BootWell creation is built into Drive Genius so that you don’t need to use any third party bootable USB creators that can often be complicated to get working. Here is how you can easily create a BootWell using Drive Genius 5:
Open Drive Genius on the computer you’d like to create a BootWell drive for.
Select your internal macOS startup drive from the ‘Drives’ section on the left side of the window.
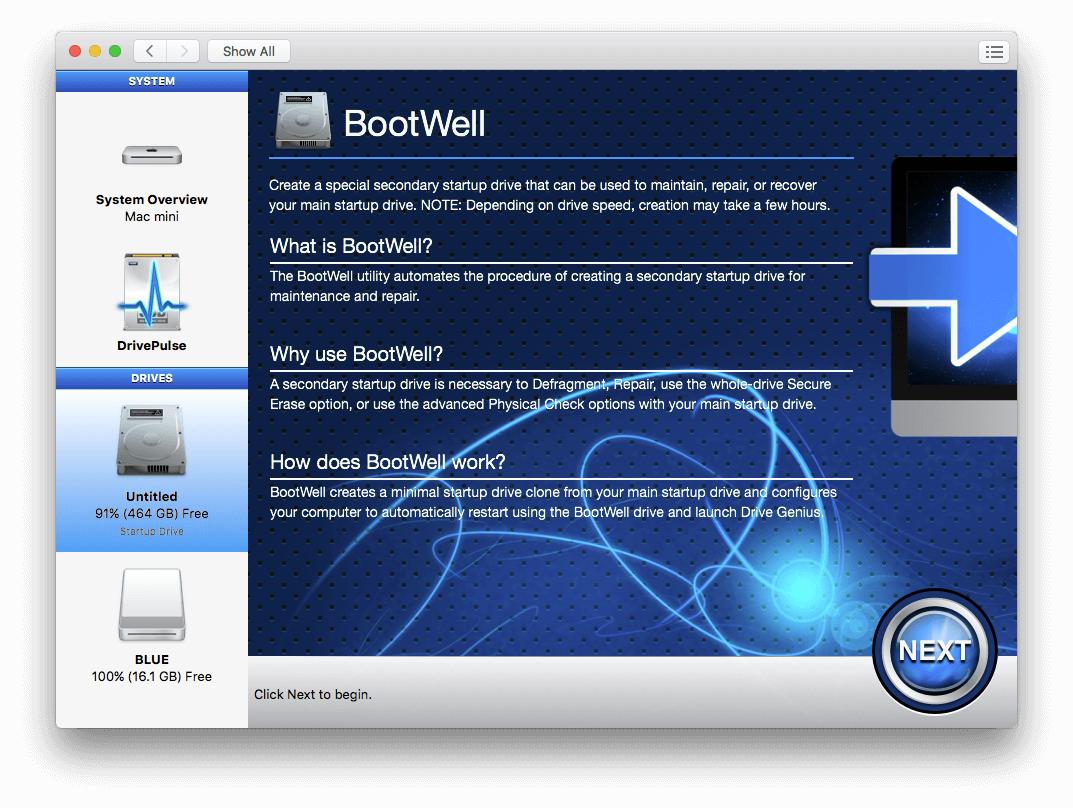
Select the BootWell utility from the ‘Protect’ section of the main window area.
If this is your first time using this utility, you will be presented with some information about the BootWell feature. After reading, press ‘Next’ to continue.
A drive list will appear in the main window. If you have not done so already, connect your USB 3.0 flash drive (8GB or larger required) to your computer and select it from the list of drives.
Click ‘Start’ to begin the BootWell creation process. Note that this will erase all data on the USB, so ensure it is empty or does not contain needed data before proceeding.
To boot your computer from the USB BootWell, simply restart or power on your computer while holding down the ‘Option’ key on your keyboard. This will take you to a menu where you can choose from available devices to boot your computer. From here, simply select the Drive Genius BootWell to be taken into the software run from the USB.
How to Create a Bootable USB in Drive Genius 4
Drive Genius 4 is a legacy version of our Drive Genius software that supports macOS 10.8-10.9.5, and has been designed with the first iteration of BootWell technology that will act as the secondary startup drive so that you can boot your system and run repairs onto the internal drive of the computer.
With the BootWell drive, most of the hassle of creating a secondary drive will be taken care of by the software itself. All you have to do is follow these simple steps:
Open Drive Genius on the computer you wish to create the startup drive for.
Plug in the Drive Genius USB 3.0 drive or insert your own USB 3.0 Drive (The USB drive will need to be at least 8gb in size and you will want the drive to contain no data; the BootWell creation process will erase the USB drive).
Select your internal hard drive from the drive list on the left hand side of the software. By default, this will be ‘Macintosh HD’.
With the proper drive selected, now click on the BootWell feature within the ‘Protect’ section.
In the list of drives, select the USB flash drive you intend to create into the BootWell device.
Click ‘Start’. This process can take up to an hour and a half before the drive is created successfully.
When the creation process is finished you will be booted into the Drive Genius BootWell. If you were just creating the BootWell for future use, you can reboot back into your normal system one of two ways: you can turn off your computer, disconnect the BootWell USB, and then turn your computer back on, or you can select the Apple icon on the top left hand corner of your screen and select Startup Disk then select Mac HD.
Once the BootWell is successfully created, you will not have to wait through the long creation process again. You can just boot your system off of the Drive Genius BootWell. To boot from the BootWell, you will need to connect the USB directly to your computer. You do not want to be going through a Dock or a Hub.
With the BootWell connected, turn on your computer while holding down the OPTION key on your keyboard, and keep the OPTION key held until you see a list of drives appear on your screen. Once you see the list you can let go of the OPTION key and select the Drive Genius 4 BootWell.
While you are within the BootWell environment you will be able to run more intensive utilities such as defrag and rebuild onto the internal hard drive of your computer.
How to Create a Bootable USB in Drive Genius 3
If you are running on Mac OS 10.7.5 or older you will need to be running on Drive Genius 3, and the process to create the secondary startup drive is a bit more involved. To create a viable secondary startup drive on these older operating systems, you will still need to have a USB drive of at least 8gb in size. Keep in mind the process of creating this into a bootable drive will erase all of the data on the USB drive so be sure to have all the data backed up in a different location, or use a new USB drive.
With the release of the new Operating Systems, the download files for the old operating systems are no longer on the App store and will need to either be installed from an install file you have saved to your system in the past, or from the OS CDs that would’ve been provided at the time of purchase. If you no longer have the OS install file, you will need to get into contact with Apple; just inform them that you are trying to create a secondary startup drive to perform some drive maintenance on your main drive.
After you have been able to get a copy of the install file for your specific operating system, you will want to run it by double clicking on the file. Follow the on screen instructions, however, when asked where you would like to install the Operating System you need to select the external USB drive you have ready to turn into your startup disk. Just following the default options will reinstall the operating system onto your computer erasing all of your files.
The installation process is going to vary depending on the type of drive and connection you are using, but a USB 2.0 drive will take a few hours to fully install the operating system. You will want to make sure you have your computer connected to power during this process. If you were to lose power mid-installation you would need to completely start over.
Once the Operating System has been fully installed, you should be directly booted into the new USB boot drive.
If you have previously created the secondary startup drive, you will need to perform an Option Boot to boot into the drive. To perform an option boot you will want to hold the OPTION key down on your keyboard as you are turning on the computer. Keep the OPTION key held until you see a list of drives appear on your screen (when you see the list of drives you can release the OPTION key). From this list of drives, select the External USB drive you have created.
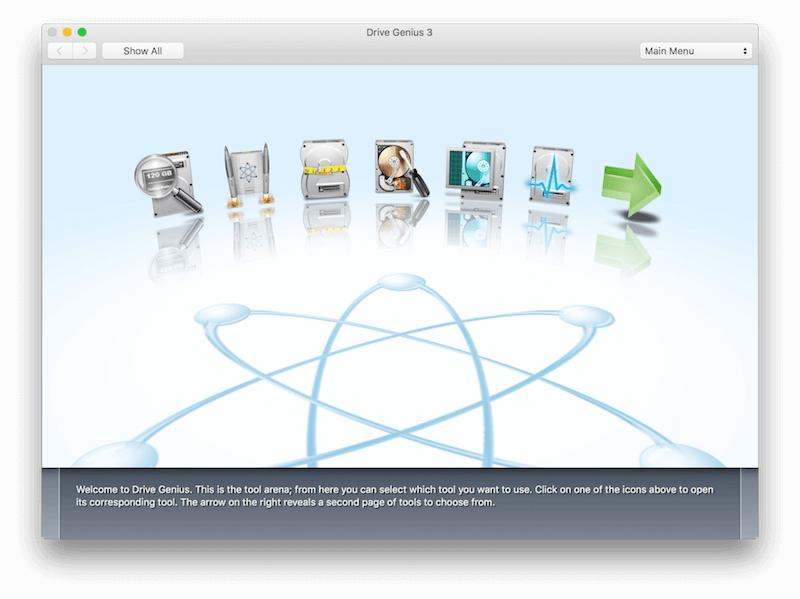
When booted into this new external drive, it will be a fresh installation of your Operating System and should appear as if the computer was brand new. From this new installation you will now need to install Drive Genius to the external USB drive.
With Drive Genius installed you can now begin to run the more intensive utilities such as Defrag, Rebuild, and Repartition.
Why Is It So Much More Complicated for Older Systems?
In 2011 with the release of OS 10.7 (Lion), Apple stopped supporting Live Defrags through their Disk Utility Tool. A live Defrag means that you were able to defragment your computer’s hard drive without having to be booted to a secondary startup drive. Once the change was made there was not an easy way to run a defragment, and users would need to run through the above steps to create their startup drive. Not only was the process overly complicated, it would take an extremely long amount of time.
When this change went live, the habit we saw beginning to form was that users were simply no longer defragging their systems, as it just took too much time for them to deal with. This resulted in more users having their drive completely fail on them, and then running into a data loss situation where they have lost valuable data. Keeping your computer’s hard drive in good health is one of the best ways to protect yourself from a potential data loss.
Drive Genius was built to help users keep their systems in the best health possible so that you will never run into a data loss situation and won’t need to use software such as our Data Rescue to recover lost data.
About the Author
Matt W.
My name is Matthew and I am a Technical Support Representative for Prosoft Engineering as well as our sister company, The Data Rescue Center. I am a people person and it is my passion to help others successfully use, and maximize the potential of their hardware and software.