Windows Data Recovery Software
Computer users, both professional and novice, are often faced with the common problem of how to recover data from a hard disk after it has been accidentally deleted or reformatted. Data loss from the logical issues mentioned above occur all the time, but even physical damage can cause data loss. You may find yourself facing this same problem, simply by mistakenly pressing the wrong button or accidentally dropping an important file into the recycle bin. When there is no recent backup that can replace the lost or deleted files, you will need to turn to other methods of getting your files back.
The Data Recovery Solution
If you are here today searching for a means to recover missing files, the important thing to know is that there is software that can recover files that have been deleted or accidentally erased. While searching online, you may come across various data recovery software that can restore lost or deleted files that require you to pay to use the software. Of course, data recovery software is not always guaranteed to work since there are ways that files become unrecoverable, but I will explain more on that later in the section “How To Check File Integrity”. For your data recovery solution, I always recommend going with a company and software that allows you to see what can be recovered before paying for the software.
This is why I can stand behind Prosoft Engineering Data Rescue software for Windows, since it offers users the ability to download and run a scan on your hard drive to preview files that have been lost or deleted before having to pay for the software. The demo option is available to everyone and only excludes the recovery of the data. You will be able to check if the drive is mountable to run the scan and, once the scan is finished, the preview option will give you the ability to preview the files that you want. This way you can be sure they can be recovered and opened.
Data Rescue PC is a powerful recovery tool for Windows users. Not only can it recover the most common types of files, but it can also recover from damaged partitions. Data Rescue PC combines ease of use with performance and provides users with a reliable solution to any of the data loss issues mentioned above. With the numerous advancements to the recovery engine of Data Rescue PC, and the free file preview option, this should be your first choice when searching for Windows data recovery software.
How to Check File Integrity After the Scan
Even though the software shows a list of files after the scan, these files could still be unrecoverable due to either damage or corruption within the file. The most common way that a file becomes unrecoverable is when it is overwritten after being deleted. This will occur when the computer is still being used after deletion and new downloads overwrite the previous space that the deleted file had occupied.
Note: It is recommended that you start the recovery immediately after deletion and that you do not write anymore data to the hard drive.
Sometimes larger files, like movies, will have information spread across the drive and are much harder to recover than smaller file types like documents. Each file must contain every piece of information that created the file in order for it to be able to be opened.
This is why it is very important to verify the file integrity with the preview option in Data Rescue PC. This will allow you to visually see the file and make sure they display correctly.
In cases where data recovery software can not scan the drive, there are physical data recovery centers that can take over the job. Prosoft Engineering has a sister company called The Data Rescue Center, where they specialize in physical data recovery. If you know that your hard drive is failing, or if the drive does not mount to your computer, then you can send the drive to The Data Rescue Center for a free evaluation.
Chat or Email… We’ve Got You Covered
Losing your data can be a traumatic and overwhelming experience. If you are unsure about how to use our data recovery software, Prosoft Engineering provides free technical support in their California-based headquarters. Our technical staff will provide professional assistance with any issues that you are having with the software. Even if you are running the demo of our software, technical support can help guide you to start your recovery. You can contact our support team via chat or email.
A Handy Guide to Windows Data Rescue Software
If you have downloaded Data Rescue for Windows, you can use this step-by-step guide, where I will try and cover everything you need to know during the recovery process.
Step 1:
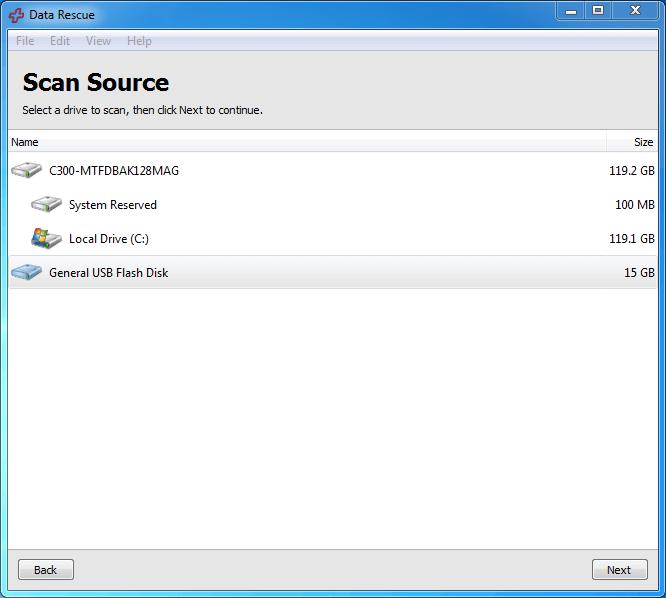
After downloading and opening the application, press “Start Recovering Files” then select a source. The source has to be the drive in which you lost files on. You will want to select the drive as a whole, rather than the partition within the drive, to obtain the best results. You can also scan a partition. An example screen is shown below:
Step 2:
Select the Physical Hardware name of the hard drive that contained your lost data from the source list.
In the example above, we will be scanning the highlighted General USB Flash Disk, a 32GB USB drive that contained a collection of pictures and document files before being accidentally formatted using Windows’ built-in format utility.
After confirming your selection, press “Next” to be taken to the scan selection screen.
Step 3:
On the scan selection screen you will be presented with two options as shown in the screenshot below:

In this example we have selected a Deep Scan, which is preferable for a formatted device. You can click each scan to learn more about its uses. After choosing a scan type, press the “Start” button in the lower right to begin scanning.
Step 4:
Once you complete the scan of your device, you will be presented with the scan results screen.
Raw data recovery occurs if the original file or folder structure can not be restored during recovery. This data will be placed in the Reconstructed Files folder. This can happen with deleted files, reformatted drives, or be caused by severe corruption. Here is an example:
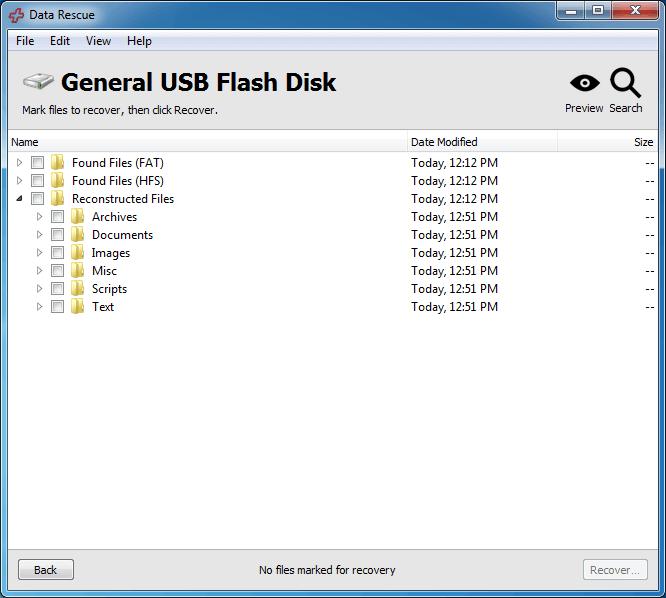
As you can see in the above image, the raw contents of files are grouped by file category. This is done because contents of files lost when formatting a hard drive are no longer associated with their file or folder names.
Step 5:
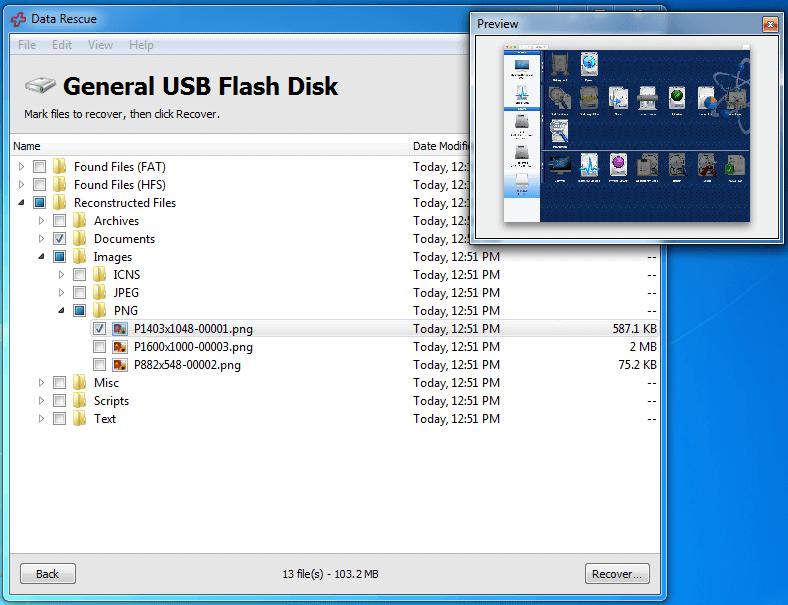
You will then have to preview or open the files for the file type you are looking for in order to verify the contents of a file and identify it. To preview an individual file, highlight the file and press the “Preview” button in the upper right of the software window.
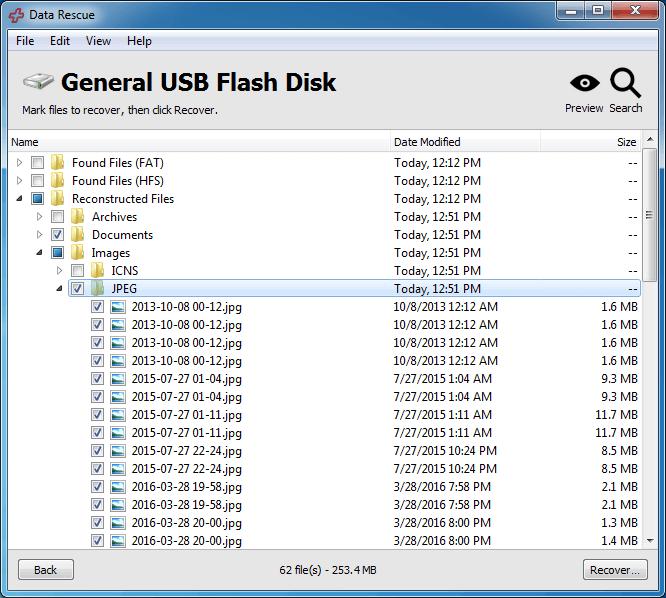
Below you can see the scan results screen further expanded to show the JPEG subfolder in the Images directory. As you’ll recall from the example, this USB contained pictures and documents before being accidentally formatted:
Step 6:
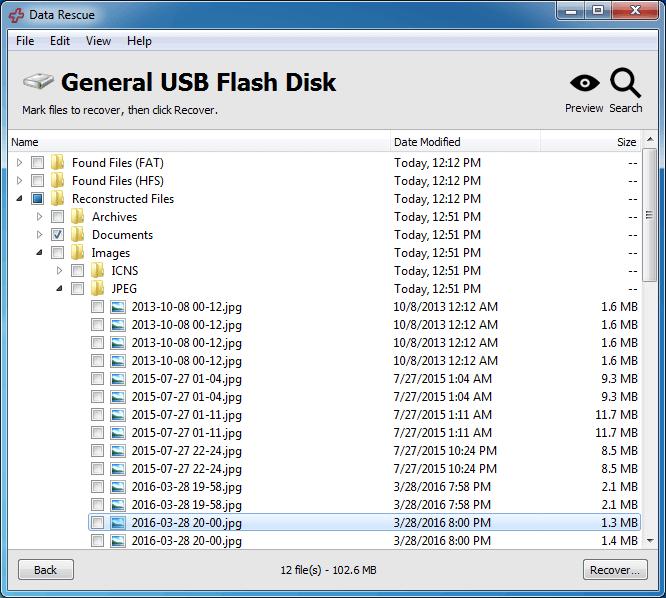
Always remember to never recover files to the same drive that you scanned because you run the risk of overwriting your data! In order to recover the files, you will need to checkmark each file/folder you would like to recover by clicking the checkbox next to the file or folder, or pressing space with a file or folder highlighted.
Make sure you preview several of your files to identify them and verify they were not damaged, as raw recoveries are much more complex. You can also mark entire folders from the directory list to check all contained files, as shown in the example below, where all JPEG files have been selected for recovery from the formatted device:
Step 7:
Once you have marked the files you’d like to recover, press the “Recover” button in the bottom right of the Data Rescue window. If you are using the demo version you will receive a prompt to purchase. The full version of the software can be purchased to recover the files you have identified and marked. You can also access the activation window by going to Help → Activate.
Once the full version of Data Rescue PC is activated, you will be automatically taken to the Select Destination Folder Screen after pressing “Recover”:
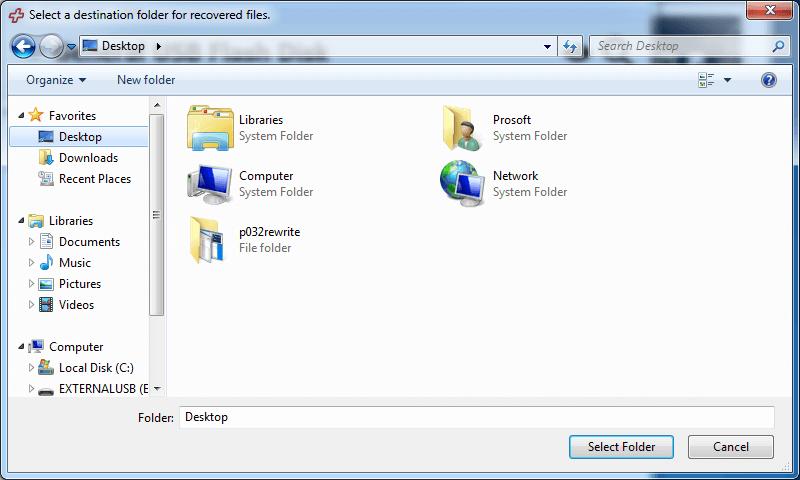
From this window, you can select where you would like to recover the files to. In our example, we are saving the files to the desktop since we scanned an external USB drive.
You can select any location, as long as it is not on the same accidentally formatted drive that you have scanned for recovery. You could potentially overwrite files that still need to be recovered, so Data Rescue PC never allows you to write to a Source drive.
A folder will automatically be created in the recovery destination that contains your recovered files. After selecting a destination location, press the “Select Folder” button to recover your files.
Step 8:
You have now successfully recovered your files!
To access the files, simply navigate to the hard drive or folder you selected as your destination. From here you can open, rename, and reorganize files as needed. Once you have confirmed that you have recovered all data from the device, we recommend making a backup of the recovered data. You can then use the device again (if it is not physically damaged) once the files have been safely recovered, allowing the old files to be overwritten naturally.
About the Author
Matt T.
My name is Matt and I work alongside the technical support team at Prosoft Engineering to provide friendly customer support for anyone using our software. I am also a customer service representative for their sister company, The Data Rescue Center. I enjoy helping others and strive to inform users on how to keep their files safe and maintain performance for their computer.