You Accidentally Erased the Wrong Hard Drive!

Have you ever deleted something important from your computer and tried everything to get it back? Accidentally erasing an entire hard drive in Disk Utility happens all the time, and is a common situation that we hear about at Prosoft Engineering. The most important thing to know is that the data from that hard drive can still be recovered, as long as you take immediate action to resolve the issue.
I can recall helping a customer who had an external hard drive that was accidentally erased in Disk Utility. He had two external drives that were identical models, and he accidently chose the wrong drive to erase. He thought that all of his documents, pictures, and music from this drive were now lost, but a friend referred him to Data Rescue for Mac.
He contacted Prosoft’s support team or assistance in getting started, and we guided him to starting a Deep Scan. A Deep Scan is what you would want to run if your entire drive/volume was erased or reformatted.
When the scan finished, he called back for some help going through his scan results. I walked him through how to navigate the results and how to mark files for recovery. He marked the files and folders that he wanted to recover and then was able to recover them to another drive.
He was then able to go through the files that he recovered and found his important documents, pictures, and music. He was very happy with the results of the recovery using Data Rescue, and glad that we were able to help him through each step.
How Hard Drives Work and Why It’s Possible to Recover Erased Data
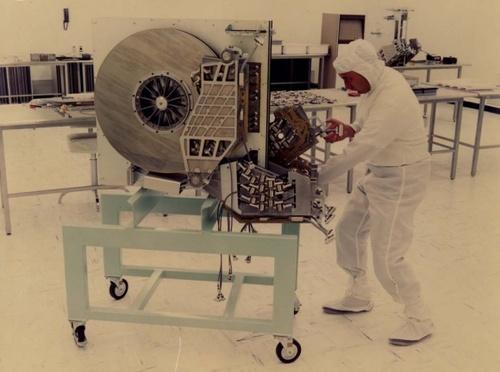
Most hard drives contain moving parts and these are referred to as disk drives. The image below shows a disk drive from the late 1970s. The large round disk is called the platter, and is where the data is stored. The object attached to the platter would contain the read/write heads that are used to read and create new data on the drive.
Whenever your hard drive is plugged in and running, it will continuously read and write data to the drive. This data contains all your favorite music, your most memorable photos, and the documents that you need. Erasing all this data does not wipe those files from the hard drive completely, but instead shows the drive as having free space.
Free space refers to the available blocks that the drive can write and store data to, so that you can always access that file. If you have erased the wrong hard drive, the free space could still contain all this data that you have erased.
However, if you continue to use the drive and download more data, you will cause the drive to write the new data over that free space. This makes the files that have been accidentally erased from the hard drive unrecoverable.
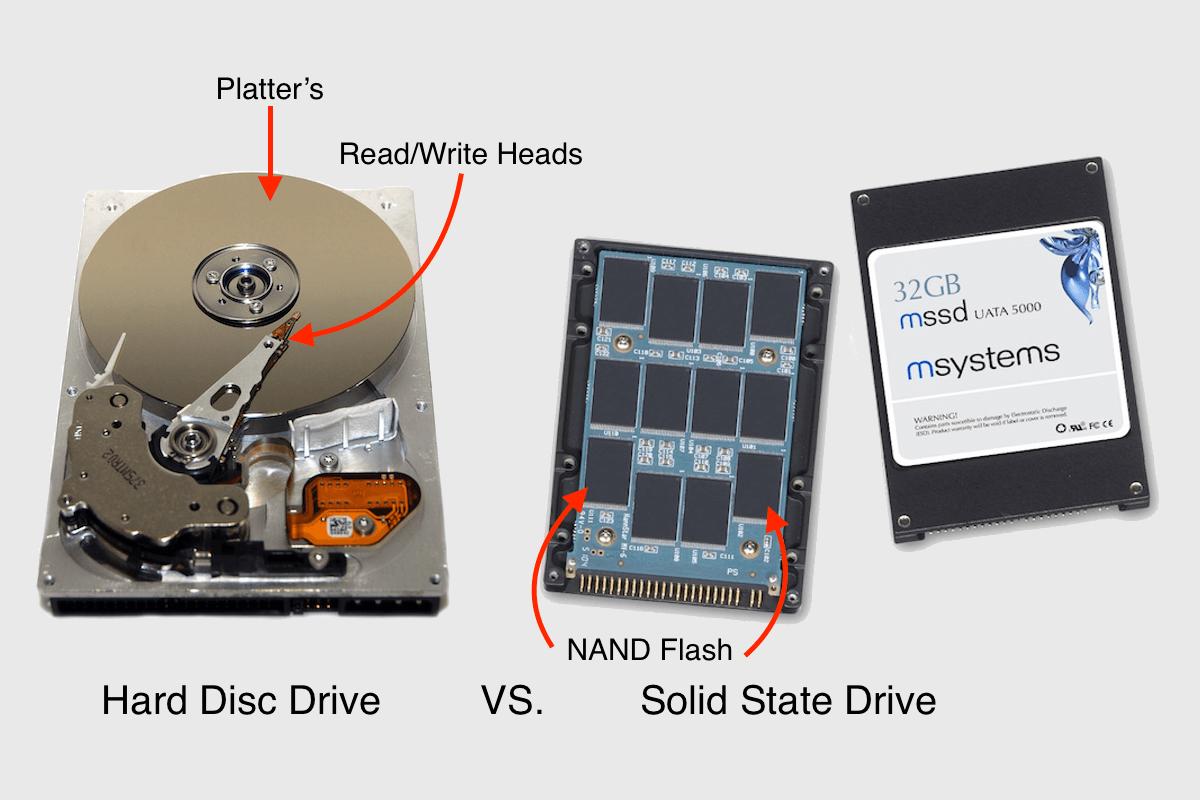
Hard drives have come a long way from traditional disk drives. After advancements in flash memory, SSD cards are now more popular as they are becoming more affordable. You can see the physical differences of a disk drive and SSD drive in the image below. Notice how there are no moving parts on the SSD drive. This is because instead of using read/write heads and platters, the SSD drive uses NAND Flash to store the data electronically.
A form of data loss that would not be able to be recovered is shown In the image below. The platters of the drive are being scratched while the discs are spinning, causing all the data on this drive to be damaged and making it much harder to recover. If you dropped your drive while it was spinning, the read/write heads of the drive can cause damage in this form.
So You Accidentally Erased the Wrong Hard Drive
No worries, it happens all the time. Although, there are some important things you should know before you start the recovery process.
If you are looking to recover deleted files from a hard drive, it is best to not use that hard drive again until you have begun the recovery process. The biggest mistake you can make to risk losing your data would be to think your data is gone and continue using the drive. Using your computer will continue to write new data and overwrite the files you want to recover.
Whether you are browsing the internet, downloading music, or running any other applications, your hard drive is writing and saving that data to the free space area. Your files will be registered as “free space” if you have erased the wrong hard drive, initialized the drive, or deleted a certain file.
Data Recovery Software to Recover Missing or Deleted Files
The data recovery software, Data Rescue, is capable of recovering files from an accidentally erased hard drive. You can try our demo of the software to see what Data Rescue can recover. The application will allow you to preview your files, since this is the best way to determine if those files can still be opened and are not corrupted.
Data Rescue software has helped millions of people recover files from their hard drive after accidentally erasing all their data. Once you have downloaded your demo of Data Rescue, you will see for yourself how many files you can recover and be able to preview them at no charge. If you are ready to use the software, check out the section “Using Data Rescue to Recover An Erased Hard Drive.”
Using Data Rescue to Recover Your Erased Drive
After you have installed the Data Rescue application, you are ready to run a scan and see which files you can recover. The steps to recover the data from your erased hard drive would depend on your specific scenario. Check out which recovery fits you below, whether you have erased your external drive or the internal Mac drive.
Recovering From Erased External Drive
If you are recovering files from an external drive that you have erased, you can run a deep scan immediately and skip the boot process by selecting the ‘Start New Scan’ tab. When the scan is complete, scroll down to “After Your Scan Has Completed,” to see what you need to do with the result.
Recovering From Erased Internal Drive
If you are looking to recover from your internal drive, then you will just need a temporary storage location to start the scan. If you cannot access your internal drive, check out the section “Recovering From Non-Booting Mac,” since you will have to create a separate bootable drive.
The temporary storage location will allow the application to store data during the scanning process so that the files on your internal drive will not be overwritten. I would recommend using an external drive with enough space to transfer any recovered files, since you can use the external drive for temporary storage. You will be able to change the temporary storage location after selecting ‘Start New Scan’, choosing your internal drive and selecting ‘Deleted Files Scan’. Check out “After Your Scan Has Completed,” to see what you can do with the results.
Recovering From Non-Booting Mac
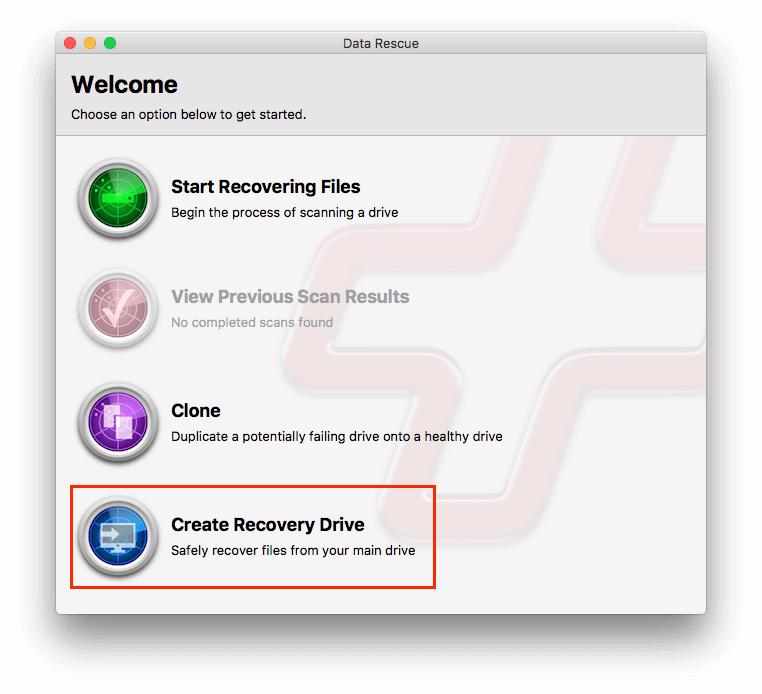
If you have accidentally erased the internal drive of your computer and can no longer access the drive, you will need another computer to create a bootable drive that we call the recovery drive, also known as a BootWell. This will allow the application Data Rescue to run a scan on the non-booting Mac that you want to recover.
If you have another Mac with the same operating system as the non-booting mac, then you can use that computer to create the recovery drive. After you have downloaded Data Rescue to the working Mac and have an external drive you can use for the recovery drive, then you can continue with creating in the software.
If you are having trouble creating a separate bootable device, refer to this helpful step-by-step guide for creating the recovery drive.
Note: Creating the recovery drive (BootWell) will overwrite the data on the drive you have selected. Please make sure that you have selected the correct drive to create the bootable drive so that you do not erase more data.
Using “Option Boot” for Recovery Drive on Mac
Now that you have created the recovery drive, you are going run an option boot so that you can access the newly created bootable drive. To do this you will first want to power off the computer. After you have shut down the computer completely, you will then turn the power back on and hold the ‘Option’ key until you see a list of drives on the screen. Use the arrow keys to select the recovery drive and select ‘Enter’.
After the boot process has completed, you are ready to start recovering files. You should see this option when the application loads. After you have selected to start recovering files, the next step is to select the source drive that you want to recover the files from. Once you have selected the drive that was accidentally erased, you will want to choose the ‘Deep Scan’ option to recover the most amount of data from that drive.
After Your Scan Has Completed
You’re almost finished! Now it’s time to see which files you can get back. This process may take awhile depending on how much data you have, but you are really just verifying that most of the files will open in the preview.
There will be two folders displayed called “Found Files” and “Reconstructed Files.” These folders will have your files sorted by file type. You can preview the files within the software to make sure they are recoverable. If you are running the demo version you will have access to this feature. To preview the file, just highlight which one you want to see and click on the icon that looks like an eye. This is located to the left of search bar at the top of the application.
Once you know which files to recover, you will need somewhere to transfer them to. With an external drive you can just recover to the internal drive, because it will be writing the erased data to another location. Recovering files to the same drive can result in data loss because the drive will write the data it is recovering over data that is has not recovered yet. If you are recovering files from your internal drive, you will want a separate external drive to recover the files to.
Are You Backing Up Your Data?
Having a backup drive can save you from losing your important files. Scheduling a regular backup of your data will keep your data secure in case you accidentally erase your hard drive. Hard drives typically have a lifespan of 3-5 years, so even if you did not accidentally erase the drive yourself, the drive can end up failing and cause data loss.
Data backups have become much easier to do, and with the Data Backup software from Prosoft, you can run scheduled backups on the files that are most important to you. With the option of customizable backup sets, you can pick a time for the backup to start that is convenient for you. After you have backed up your data, you can feel confident that your data is safe and secure.
If You Erased Your Hard Drive, There’s Still a Chance of Recovery
Now you know there is a chance to recover all of your data after you accidentally erased your hard drive. All it takes is immediate action so that you do not lose any important data you have stored on the drive. This is also a good time to look into backing up your data, so if you do erase your hard drive, you won’t need to use a data recovery software.
If you found this information helpful, you may want to check out some of our other blogs with Prosoft Engineering.
About the Author
Matt T.
My name is Matt and I work alongside the technical support team at Prosoft Engineering to provide friendly customer support for anyone using our software. I am also a customer service representative for their sister company, The Data Rescue Center. I enjoy helping others and strive to inform users on how to keep their files safe and maintain performance for their computer.