How to Recover Deleted Emails from Apple Mail on a Mac

One of the most popular tools for accessing emails on a Mac operating system is Apple Mail. This built-in utility can be used to access email accounts from various other free email service providers including Apple’s iCloud, Outlook, Google, Yahoo, AOL, etc., in addition to allowing other providers to be entered manually.
Besides integration with some of the other features on your Mac operating system, the main advantage to using an email client such as Apple Mail is the ability to easily archive or backup mailboxes and collections of emails to your computer, rather than storing them on your email provider’s server or their cloud service. This makes it easy to quickly access past emails, and provides the security of having an additional copy of the data.
Unfortunately, there are still ways to lose email files that are being saved to your computer. One example our support team has seen in a customer case includes accidentally deleting the entire email account from Apple Mail. We have also seen cases in which a user’s entire operating system was reinstalled, and they lost all of their files, including their mail archives.
Fortunately, using data recovery software such as Data Rescue for Mac will allow you to scan a device and recover deleted emails, so long as they have not been overwritten by new data. The sections below will outline the steps we would advise a customer to take with Data Rescue in order to restore deleted emails.
Things to Know Before Recovery
As discussed above, one of Apple Mail’s advantages is the ability to archive emails locally on your computer. The email archives being stored on your computer rather than with your email provider is what makes recovering deleted emails from your Mac possible with data recovery software.
Note: If you access your Google, Apple, Yahoo, AOL, Hotmail or other email provider using your web browser rather than using Apple Mail, Data Rescue cannot recover your accidentally deleted emails.
This is because Data Rescue works by searching for file patterns in the available free space on your storage devices. If you only access your email provider through a web browser, all your emails are being archived onto storage devices owned or rented by your email provider rather than your own computer.
Since no data recovery software has the authorization or ability to directly connect to and scan your email provider’s servers or storage devices, your deleted emails cannot be restored using Data Rescue if they were not archived locally using a utility like Apple Mail.
Different Ways to Use Data Rescue When Recovering Emails
There are three main ways to use the Data Rescue application when recovering from an internal hard drive:
Install Data Rescue directly to the Applications Folder, and set a Temporary Storage Location for Data Rescue 4 to use when scanning the device.
Create a secondary startup drive on a second Mac with Data Rescue so that you can boot from the secondary drive on your problem computer to run the software.
Use a second working Mac, a Firewire or Thunderbolt cable, and Apple’s Target Disk Mode to access the problem hard drive like an external drive.
For the purposes of this post we will be following the first method, installing the software directly to the machine to retrieve deleted emails. While this can overwrite a minimal amount (less than 10MB) of deleted data when the software is downloaded, for the majority of users this will be the easiest and most effective method to recover deleted emails.
Downloading, Installing, and Activating Data Rescue Mac
For users operating on macOS High Sierra 10.13, a secondary bootable drive will be required to use Data Rescue. Security updates with Apple’s System Integrity Protection (SIP) feature in macOS High Sierra now limit how programs can access your computer’s startup drive. Using a secondary bootable drive will not affect the recovery, and can be created in Data Rescue using a USB 3.0 drive with at least 8GB of storage space. I recommend using a drive that would cover the amount of data you are looking to recover.
Every recovery scenario is unique and, as a result, deleted or missing emails will not be recoverable in every situation. Things such as hardware damage to your storage devices, electronic failure, or even the simple overwriting of files with new data can render the contents of a device unrecoverable. For these reasons, we recommend starting with the demo version of Data Rescue. The demo version has the same scan capabilities as the full version, and will help confirm that the software can recover your deleted emails that were lost.
To download the demo of Data Rescue for Mac, visit our Downloads Page and select Data Rescue 5 (requires Mac OS 10.10 or later, for earlier versions of Mac you can use Data Rescue 4).
Next, enter your email address and click the Download button. You will be sent an email to the provided address that contains a link to download the Data Rescue application, and your Demo Version Serial Number. You can copy this serial number so that it can be pasted directly into the software activation window.
After clicking on the download link in your email and opening the downloaded DMG file, you will be presented with the following screen:
Leave the downloaded DMG file open, open a new Finder window, and navigate to your Applications Folder. Drag the large Red Data Rescue icon from the DMG into your Applications folder.
Data Rescue is now installed on your Mac! You can close out of the DMG file, and click Data Rescue 4 in your Applications folder to launch the software.
Once the software is open, you will be prompted to enter a Name and Serial. Enter your name, and paste or type in the demo serial (or Full Version Serial if you have already made a purchase) from your download email. Click Activate, and you will be taken to the Welcome screen for the software.
Scanning for Deleted Emails Using Data Rescue Mac
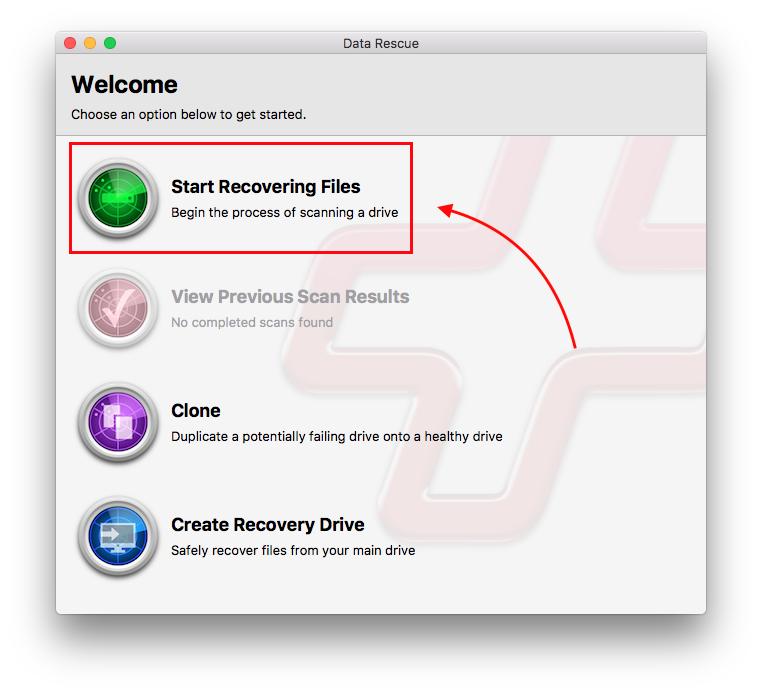
The Welcome Screen for the software will have four options as shown in the above screenshot. To begin scanning for deleted emails, select the first option, ‘Start Recovering Files’. You will then be taken to a Source window similar to the one shown below:
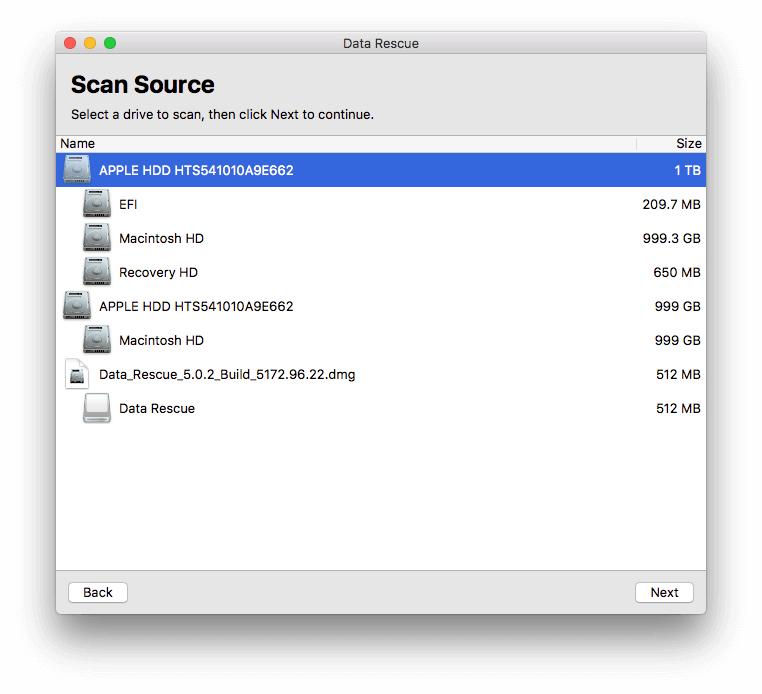
For the best chance of recovery we recommend scanning the entire hard drive that contained the deleted email archives. Normally, this will be the first one on the list for your internal startup drive.
In the example case, we will be selecting the highlighted Apple HDD, which is the physical manufacturer name given to the 1TB internal hard drive of our test computer. On our test computer, we signed into an email account using Apple Mail then deleted the account and archives manually to recreate this recovery situation.
With the drive that you want to recover deleted emails from selected, press the ‘Next’ button to continue to the Scan Type screen shown below:
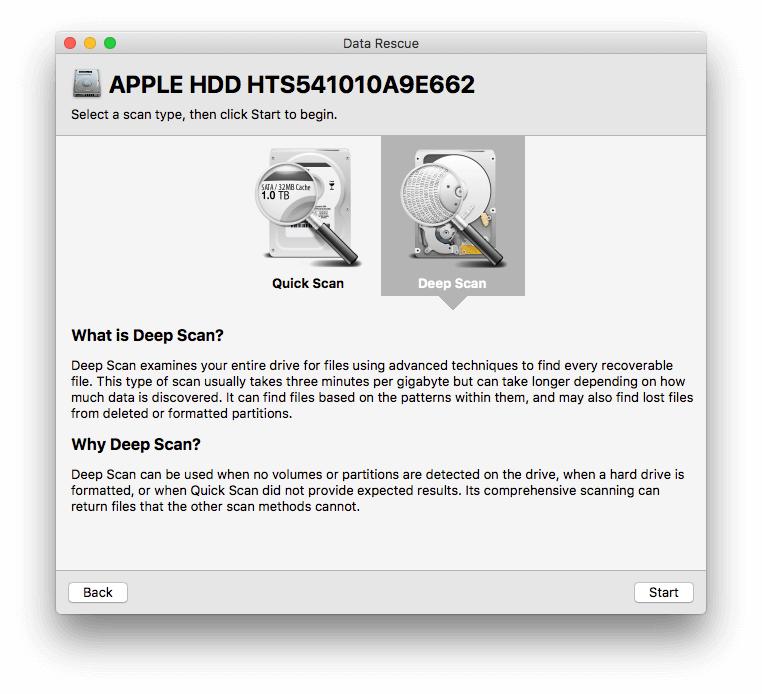
For the best possible recovery results, we recommend selecting the Deep Scan, as this will provide results from both the Quick and Delete Files Scan Types as well.
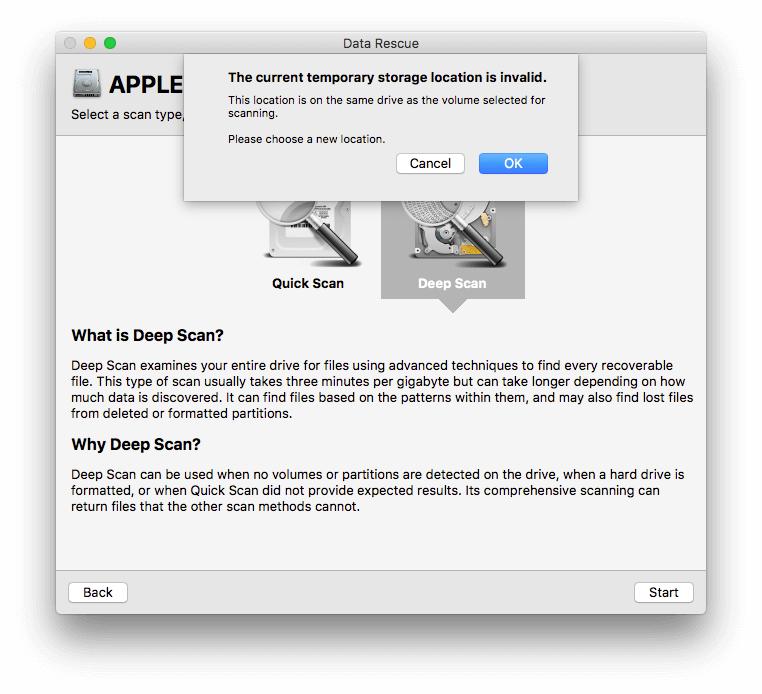
Users that are running the application from their startup drive without a temporary storage location set will receive a notice as shown above. You can change the temporary storage location by selecting ‘OK’ and choosing a secondary drive.
In the screenshot shown below, the current temporary storage location is the startup drive, which I will change to the external storage drive I have labeled, ‘Data Rescue Storage’.
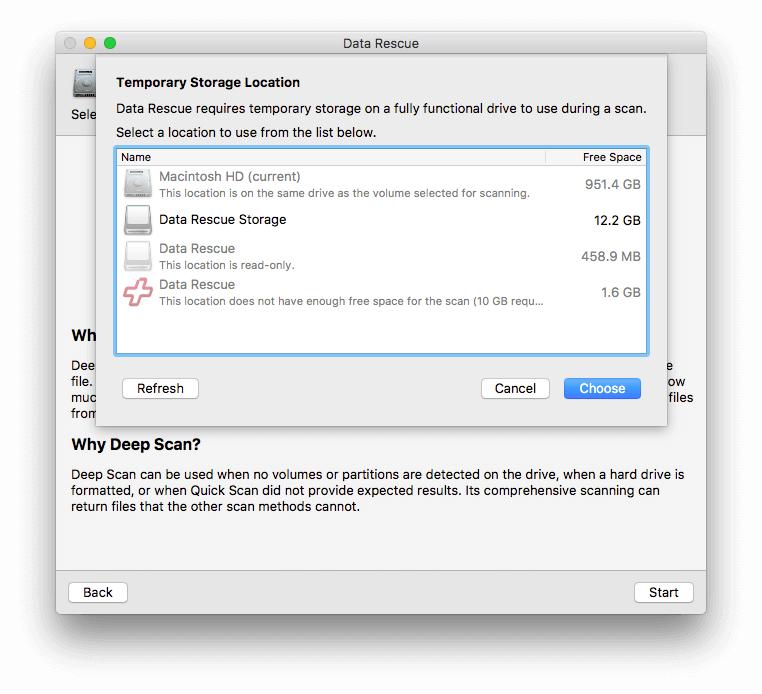
Data Rescue requires a drive to store temporary data to while scanning your internal drive. This can be any storage device connected to your computer, other than the internal drive you are scanning. We recommend using a USB 3.0 device that is 32GB or larger, as unexpected issues can occur with smaller or slower drives.
Note: If your device is not formatted for Mac (HFS+), the software will prompt you that the drive must be erased and formatted for Mac, and give you the option to proceed with this process. This will destroy all data on the Temporary Storage Location device you have selected, so please ensure you select the correct drive.
With your Temporary Storage Location Selected press the ’Start’ button to begin your Deep Scan to search for deleted emails.
Previewing and Marking Email Files for Recovery
Once your Deep Scan has completed, you will be taken to the Scan Results screen, similar to the one shown below:
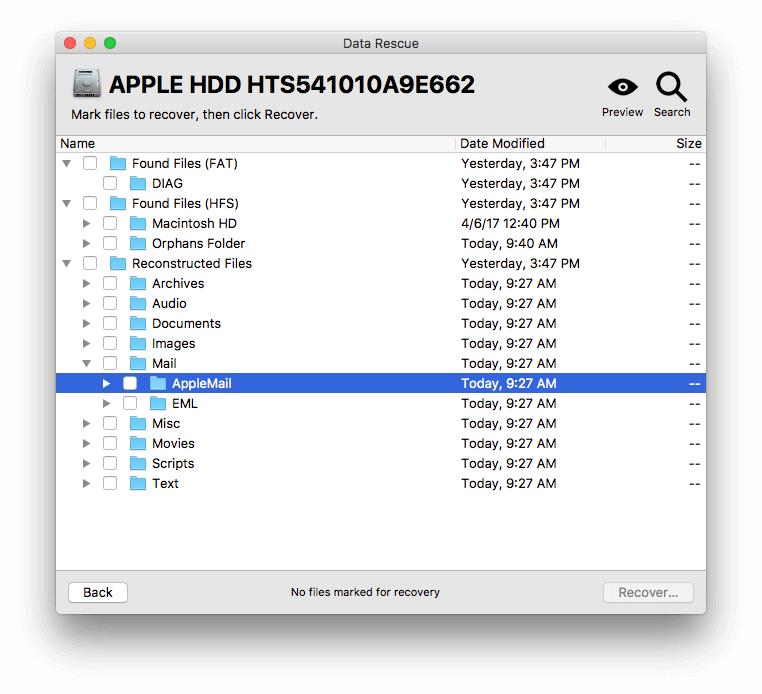
To see additional folders as shown in the screenshot, you can click the grey arrow icon to the left of a folder. In this example, we have expanded the Reconstructed Files folder.
The Reconstructed Files folder contains raw data that was present on the drive, and is where you will find any emails or files lost as a result of reformatting a hard drive or deletion.
Next, expand the Mail Folder. This will contain additional folders depending on what mail clients may be installed on your computer.
Since we are trying to recover deleted email from Apple Mail, we want to expand the Apple Mail subfolder to see a screen similar to the following:
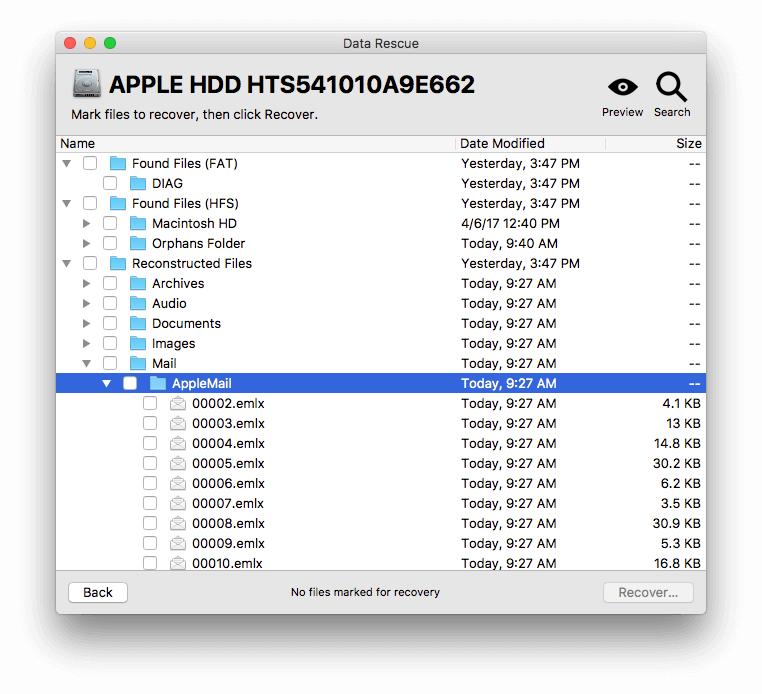
When recovering from Apple Mail, you may see two types of file extensions used by Apple Mail to archive emails on your computer:
EMLX: Files with the EMLX extension are plain text files that contain a single email message
MBOX: Files with the MBOX file extension are actually collections of email messages that are stored in plain text files, with messages being concatenated, or added to the end of the text file in a specific format or syntax to identify when one message ends and the next begins. A mail client such as Apple Mail can then look at this file and logically access the individual email messages.
Note how these EMLX and MBOX files do not have file names that make their content easily identifiable such as the text of an email subject line, or the name of a collection of messages such as an entire mailbox name.
To identify the contents of these files, you will need to preview their contents using a utility that can open plain text files, or import the files into Apple Mail. If you were to open an EMLX or MBOX file using a utility such as Apple’s built in TextEdit, you would also see file header information and other file syntax built around the actual text of the email message.
Opening an EMLX or MBOX file using a text editor makes reading the actual contents of messages much more difficult. Instead we recommend importing them into a mail client such as Apple Mail, so that they are displayed in a more familiar interface. More information on importing these files can be found in the next section.
To mark individual folders and email files for recovery, click the Mark checkbox to the left of the item you would like to select.
In our example above, you can see that we checked the Mark checkbox for the entire Mail recovery folder. This also will mark all subfolders and files for recovery, so the Apple Mail folder and individual EMLX and MBOX files are all automatically selected as well.
We are now ready to recover our email files! Press the ‘Recover…’ button in the lower right of the window. The Select Destination Folder window will open if you are using the full version of the application, otherwise you will be directed to purchase Data Rescue 5 to recover deleted emails.
Choose the destination where you would like to recover your files to. This can be located on any storage device other than the one you have scanned.
Note: You cannot recover files to the same storage device that you have lost files from, as this could potentially overwrite deleted emails that have not yet been recovered by Data Rescue.
Connecting an external hard drive or USB device is normally the easiest way to recover your files. You can also recover files to the drive you have selected as your Temporary Storage Location if it has available free space. In our example we will opt to recover files to the TempUSB drive we used as our Temporary Storage Location.
Once you have selected the folder location you would like to recover your emails to, press the ‘Open’ button in the bottom right of the window.
Data Rescue will recover the files you have selected, and place them in a recovered files folder located in the recovery destination you selected. Inside this recovered files folder, you will see the same folder directory structure that was shown in the scan results screen of Data Rescue, making it easy to navigate to email files you previewed.
We are now ready to import our recovered emails back into our email client so that we can view them.
Importing Recovered Emails to Apple Mail
The last step in the process of retrieving deleted emails is importing the files back into a mail client that can read them. To import recovered email files using Apple Mail, open up the Mail application on the computer you would like to import the files to, and follow these steps:
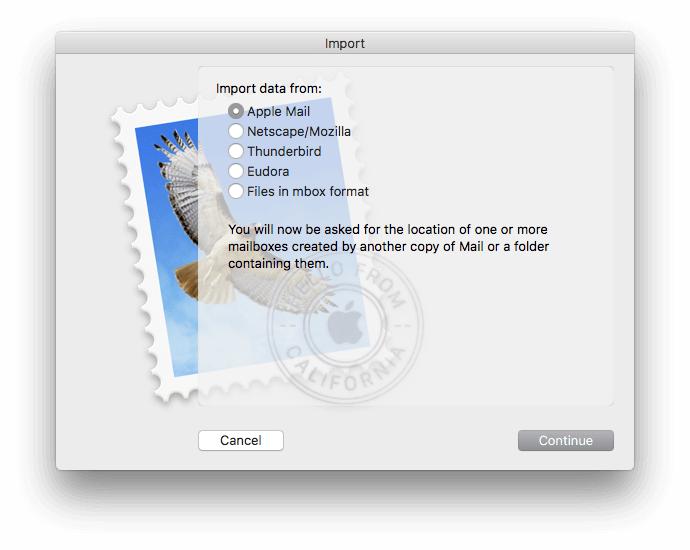
Go to File → Import Mailboxes
Select the Apple Mail marker as seen in the above screenshot, and press ‘Continue’.
Navigate to the folder that contains your recovered emails, and press the ‘Choose’ button in the bottom right of the software window. You will now see the files listed similar to the screenshot below:
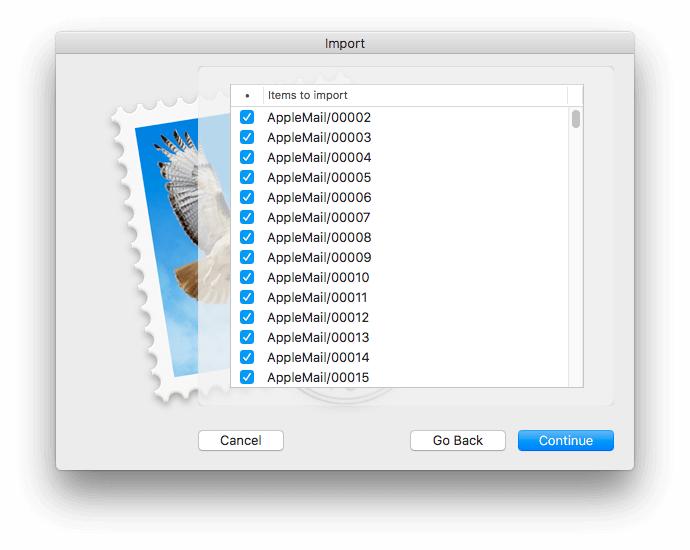
Press the ‘Continue’ button to begin importing your recovered email files into Apple Mail.
The Apple Mail import wizard will tell you what name it has given your import mailbox. Press ‘Done’, and navigate to the Import folder listed under your mailboxes to access your recovered emails.
Summary
If you have accidentally deleted or lost emails on a Mac and you use Apple Mail, it may be possible to recover deleted email files using software such as Data Rescue. Until your files are overwritten with new data, they still may be accessible, so I would strongly recommend trying the demo version to see how Data Rescue can help retrieve your deleted emails. Once you have recovered your emails successfully, they can be easily imported back into your Apple Mail so that you can access them.
About the Author

Ryan O.
My name is Ryan and I provide technical support and perform software testing for Prosoft Engineering, to ensure we provide customers with the best software experience possible. I also provide customer service for clients at The Data Rescue Center that have physically damaged devices. I enjoy helping customers maximize their chance of recovering and protecting their files, regardless of their potential data loss situation.